Settings
Contents
To open the Settings window, click the  settings
button on the application toolbar.
All application settings are grouped into tabs so you can easily find the settings you want to modify.
Support
To display and personalize all necessary information about the system, OptionWorkshop includes a few service functions:
- Open configuration folder – click to open the
%LOCALAPPDATA%\Options Workshop\folder in Windows Explorer - Open installation folder – click to open the
%PROGRAMFILES(X86)%\Options Workshop\folder in Windows Explorer - Configure logging button – click to configure diagnostics options for OptionWorkshop
- Log files… – click it to view and send log files
- Enable GPU rendering – it is recommended to activate this mode only on a technical support request
- DirectX diagnostics – information for the technical support

There are three logging modes in OptionWorkshop:
- Log verbose events (recommended) – default mode;
- Log only important events – it is recommended to activate this mode only on a technical support request;
- Log all events – it is recommended to activate this mode only on a technical support request.
To select logging mode:
Click the Configure logging button.
Select the mode from the drop-down list [1].
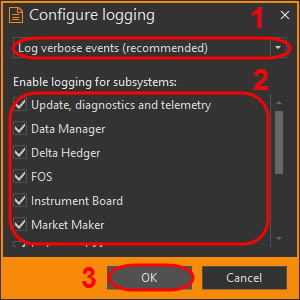
Please note that the activation debug logging mode may negatively impact program performance.
Select the diagnostics options by checking the checkboxes for specific subsystems [2].
Click the OK button [3].
Click the OK button in the Support tab to confirm your changes.
To navigate to the log file, click the Log files… button. To update the list of log files, click the Refresh button.
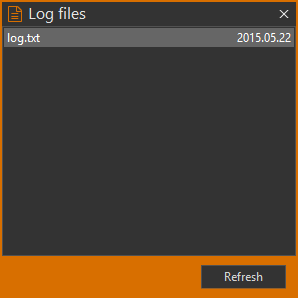
Errors can have several causes. To identify and find appropriate solutions, you can send the log file to the technical support:
Select the log file [1].

Click the Upload file button [2].
The Open file button [3] opens the log file in your default text editor program.
Click Copy to clipboard button in the opened window.
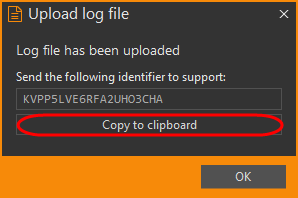
Paste the log ID into an email, describe the problem and send it to technical support.
Color scheme
OptionWorkshop includes an option to adjust its visual appearance.
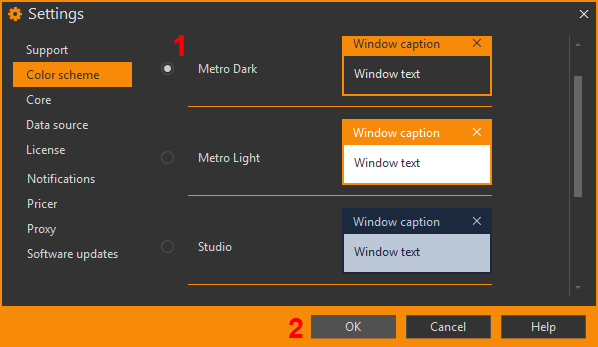
The application contains a few visual themes:
- Metro Dark (the default OptionWorkshop theme)
- Metro Light
- Visual Studio
- Aero
- Office
You may select any themes from the list. Click the OK button and restart OptionWorkshop to apply the settings.
Core
In the Core tab you can choose the Gamma format.
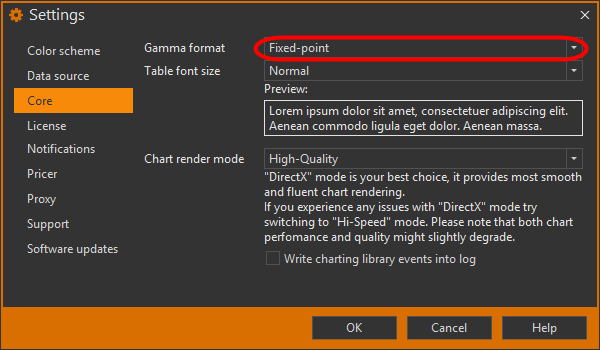
This parameter allows you to alter the Gamma parameter value's displayed format. There are two options:
- Fixed-point: fixed-point decimal notation will be used (example:
19.0234) - Scientific: standard form will be used (example:
1.90234E1)
To apply settings, click the OK button. Gamma is contained in the Positions and in the Option desk.
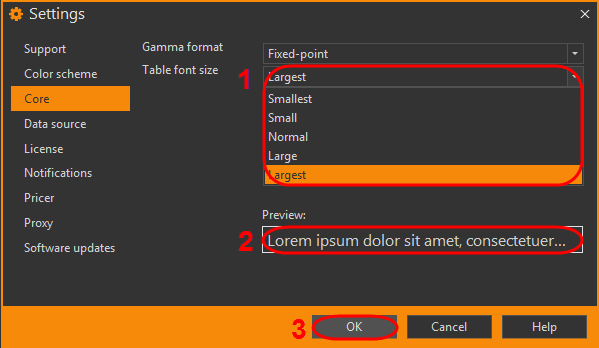
For the convenience of viewing data in the table, the font size can be changed. In the drop-down list, select the font size [1]. An example of the text will be displayed in the Preview field [2]. Then click the OK button to apply the settings [3].
If OptionWorkshop is running locally on your computer, all charts are displayed in DirectX render mode. If a program is running on a Remote Desktop, charts are displayed in HiSpeed render mode. The mode is selected automatically. In case of problems with chart display you need in the Chart render mode drop-down list select DirectX (compatible) or Hi-Speed mode and click the OK button.
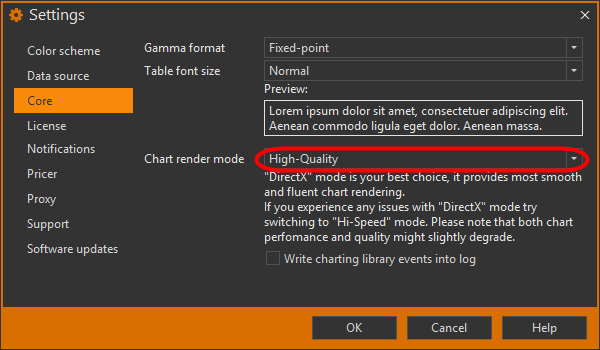
If it does not solve the problem, contact our support team via the support portal. Write chartaring library events into log – it is recommended to activate this checkbox only on a technical support request.
Data source
In the Data source tab you can configure and manage data sources. OptionWorkshop supports the following data sources:
- Interactive Brokers
- CQG Continuum
- IQFeed
Until a source is selected, the program will notify you with a pop-up about the error – no connection. Information on how to set/disable the alert is presented in the Notifications section.
Several data sources for connection to trading can be used at a time.
Adding a data source
To add a data source, begin by selecting a data source:
Start and configure the data source (see Integration with data source).
Select the Data source tab.
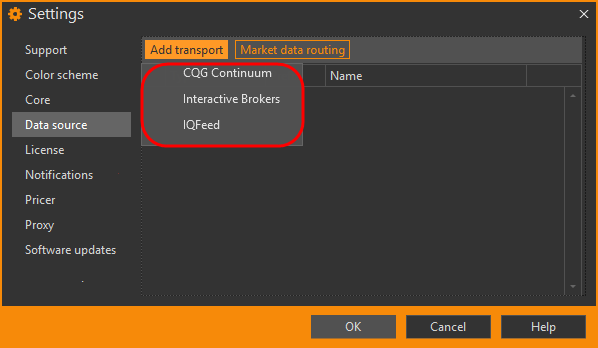
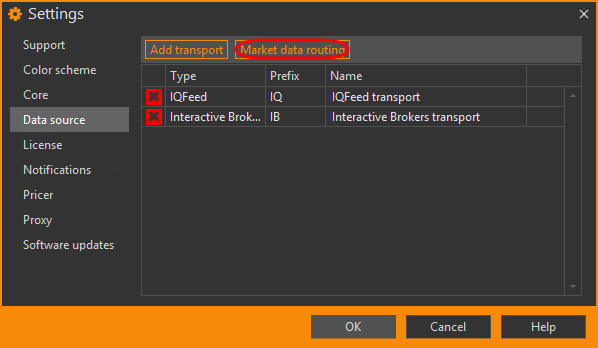
Click the Add transport button.
Select the data source type in the drop-down list. This will open a window with parameters of the selected data source.
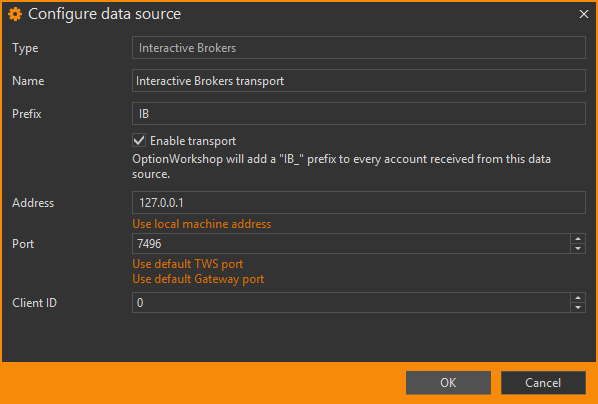
Fill out the fields in the opened window. The detailed description of the settings of each source is given in the sections:
Click the OK button in the Configure data source window
Click the OK button in the Data source tab to apply your settings.
Switching from one data source to another will reload your positions and instruments.
OptionWorkshop maps most symbols, but not all.
If at any time the software does not receive data for some instruments, it is probably a symbols mapping issue. Simply write a ticket to our support team and we will find a solution.
Deleting a data source
To delete a data source, click the  button in the corresponding row.

In the opened message, click the OK button to confirm the deletion. All settings will be reset and the connection will be removed.
Deactivating a data source
To delete the data source without removing its settings:
Double-click the desired source in the list.

Uncheck the Enable transport checkbox. NOTE: the transport will be added to the list of data sources but OptionWorkshop will not connect to this transport.
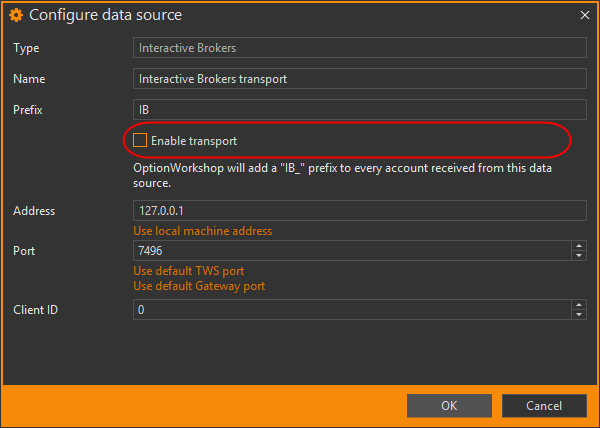
Click the OK button in the Configure data source window
Click the OK button in the Data source tab to apply your settings.
The connection will be removed. The source will remain in the list.

To activate the source, double-click the desired source and check the Enable transport checkbox.
Quick starting and stopping transports
To temporarily disable a source, use the quick start and stop buttons in the bottom of the OptionWorkshop window.
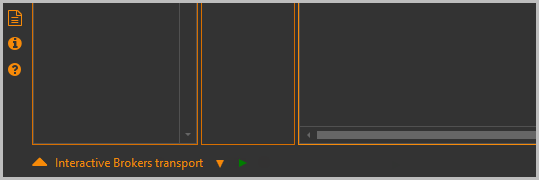
First, click the  button to open the Transport control form:
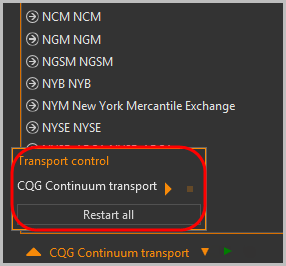
- To stop the data source, click the
 button.
 - To start the data source, click the
 button.
 - To restart all data sources, click the Restart all button.
Market data routing
Each exchange can be configured to receive data from a specific data source. To configure data source:
Click the Market data routing button.
Add an exchange using the
 button ([1] and [2]).
Select the data source from the drop-down list [3].
Click the OK button [4].

The Default row indicates market data source to use by default. To delete an exchange route click the
 button in the corresponding row.
Click the OK button to apply settings in the Data source form.
The market data will be loaded from the specified source. In order to monitor the data source connection status, there are special indicators:
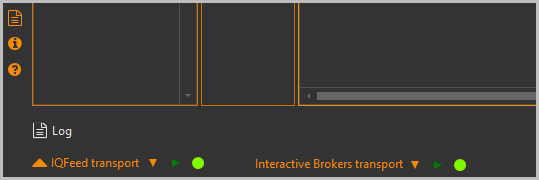
Data source name – shows the name of the currently active data source
 – blinks when a transaction is sent into the data source
 – blinks when any data is received from the data source
 – indicates no connection with the data source
 – indicates connection to the data source is being established
 – indicates that data source is connected
 /
/  –
indicates whether OptionWorkshop receives information about trading schedule or not:
–
indicates whether OptionWorkshop receives information about trading schedule or not:- Green – data is being received
- Red – data is interrupted from the data source connection
Click the  button to open the Transport control form.
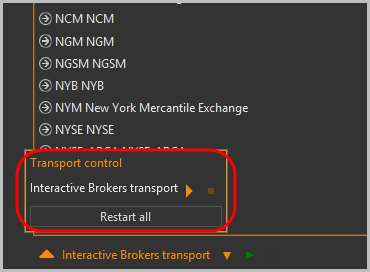
To stop the transport, click the  button.
To start the transport, click the
  button.
To restart all transports, click the Restart all button.
License
Information about how to get trial license is presented on the Getting started page. To continue using OptionWorkshop after the 30-day trial period, you can purchase a license. On the Order OptionWorkshop page, you can choose components to purchase, license period and payment method. The current pricing information on features is presented on the Pricing guide page.
Licensing information is displayed in the License tab:
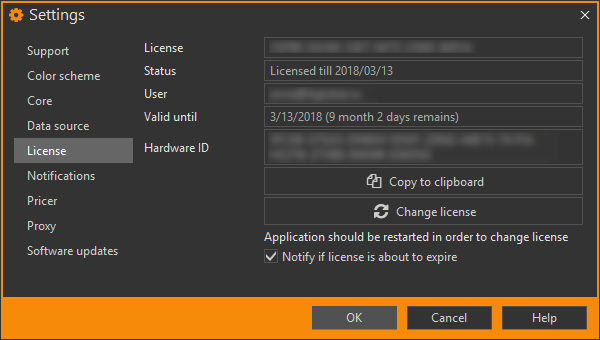
License – the issued license key
Status – current license status
User – user name
Valid until – the license expiration date
Hardware ID – the hardware ID of the computer
Copy to clipboard – click the button to copy the hardware ID

Change license – click the button to change the license

Notify if license is about to expire – check the checkbox to activate a reminder of your license expiry.
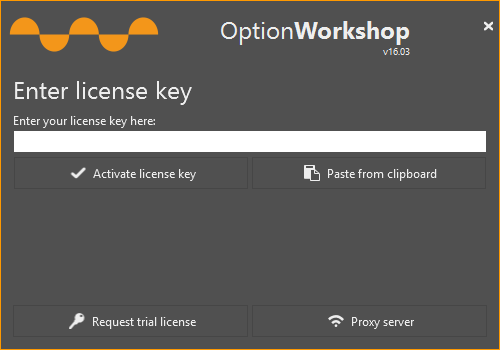
To change the license, click the Change license button. A confirmation dialog box will be displayed, in which you must click the OK button. As a result, the current license key will be reset and the application will restart. In the opened window, you must specify the new license key.
This notification (see the figure below) appears once a day for a week before the expiration of the license. To close this notification click the Dismiss button.

To disable notifications, you need to uncheck the checkbox Notify if license is about to expire.

Notifications
OptionWorkshop generates notification events during its work. In this tab you can set a sound alert on the following operations:
- Data source error,
- Order plased,
- Order filled,
- Order cancelled,
- Order modified,
- Order error,
- Fill received.
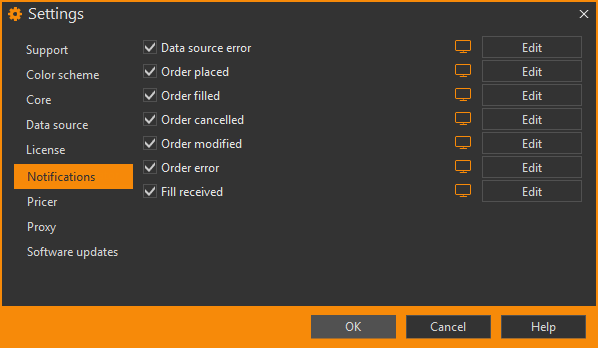
To activate the notification select the checkbox for the desired operation. Clicking the Edit button opens form, in which you can:
Activate the notification.
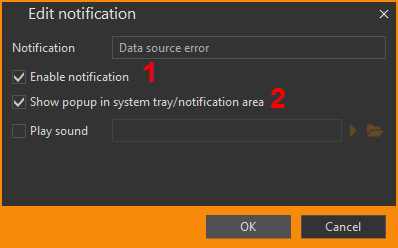
Show the pop-up in system tray.
To activate the notification sounds:

Select the checkbox.
Click the
 button and select the desired sound in Windows explorer.
Note that only WAV files are supported now (some WAV files may not be supported).
You may use the
 button to play the selected file.
Click the OK button to apply the settings.
Click the OK button in the Notification form.
Icons indicate the type of notification:
 – sound;
 – message.

Pricer
OptionWorkshop performs various calculations, such as theoretical price, sensitivity parameters, positions, orders to display on the charts, etc. Depending on your PC's computing power calculations can take a different percentage of CPU resources. This tab contains parameters that affect OptionWorkshop's pricing engine:
The Pricer interval parameter allows you to adjust the pricer time period. During this period, all market values changes are accumulated; at the end of each period, the pricer recomputes all parameters against the last actual prices. This parameter's value is set in milliseconds.
You may adjust these parameters to optimize your PC's CPU usage.
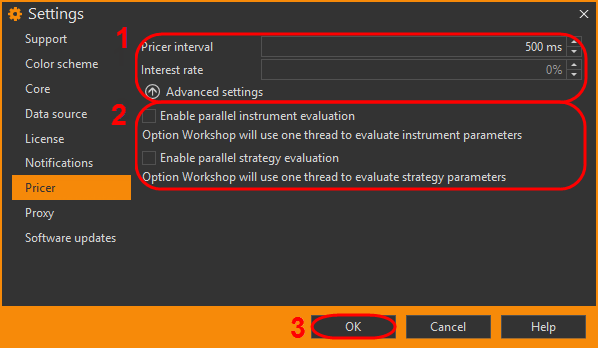
The Interest rate parameter is a risk-free interest rate. The value of this parameter affects the pricing models' computations (see Pricing models section). This parameter's value is set in a percentage.
By default. OptionWorkshop uses a single thread to evaluate instrument and strategy parameters. To speed up evaluation, both types of calculations can be done in several parallel threads. To do this:
- Select Enable parallel evaluation of instrument parameters.
- Select Enable parallel evaluation of strategy parameters.
- Click the OK button to apply the settings.
Proxy
OptionWorkshop uses Internet access for various tasks, such as:
- Receiving market data
- Calculation of theoretical prices, positions parameters
- Placing orders
- Updating the software
- Licensing
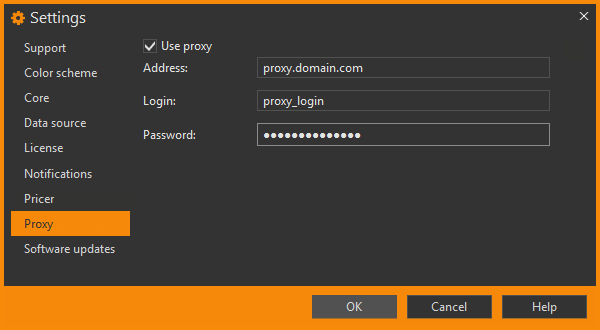
If Internet access on your PC is available through a proxy server, you may set proxy server settings:
Select the Use proxy checkbox on the Proxy tab.
Fill the parameters:
- Address – address of the proxy server
- Login – user name
- Password – password for the proxy server
Click the OKbutton to apply the settings.
If you need to use OptionWorkshop on a PC that does not have Internet access, please contact our support team.
Software updates
The Software updates tab contains:
- The version number of OptionWorkshop and the channel to receive updates
- Buttons to automatically and manually check for updates
- A button to switch between channels
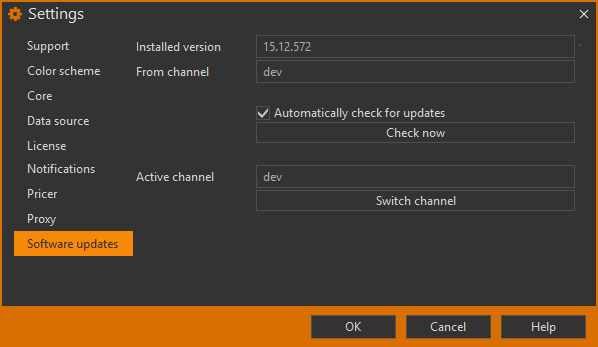
Usually only one channel to receive updates is available, but our support specialists can create a new channel for debugging the app. To switch between channels:
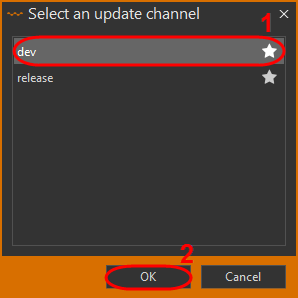
Click the Switch channel button in the Software update window.
Highlight the desired channel in the opened window [1].
Click the OK button in the opened window [2].
Click the OK button in the Software update window.
All channels work with the same database and settings files, so all settings and user data created in one version will be available in others as well.
OptionWorkshop includes an automatic update function. You may disable the automatic check by using the Automatically check for updates checkbox. You may also perform a manual check by using the Check now button.
In the Software updates section you can find a description on how to install the updates.

