Integration with data sources
Contents
Receiving real-time market data, placing orders, and tracking order status changes requires integration with data sources. OptionWorkshop allows you to:
- Configure the trading terminal/gateway and
- Set up a connection in OptionWorkshop.
You can use several data sources at the same time.
Integration with CQG
To select a data source:
Open the Settings window by clicking the
 button on the toolbar.
Open the Data source tab [1].
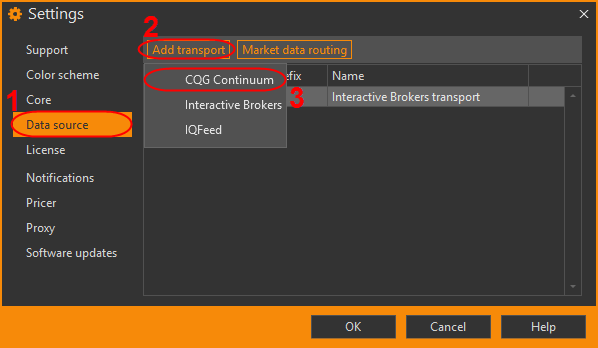
Click the Add transport button [2].
Select the CQG Continuum transport in the drop-down list [3].
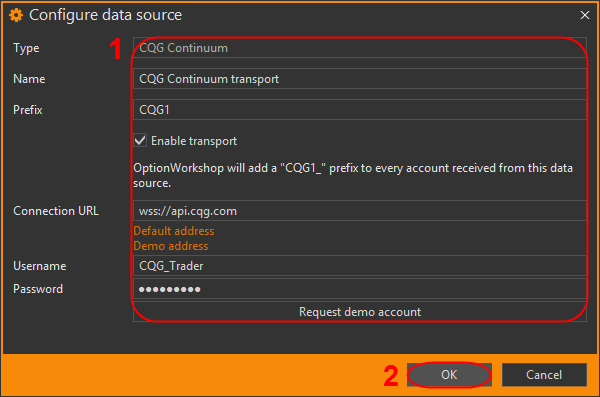
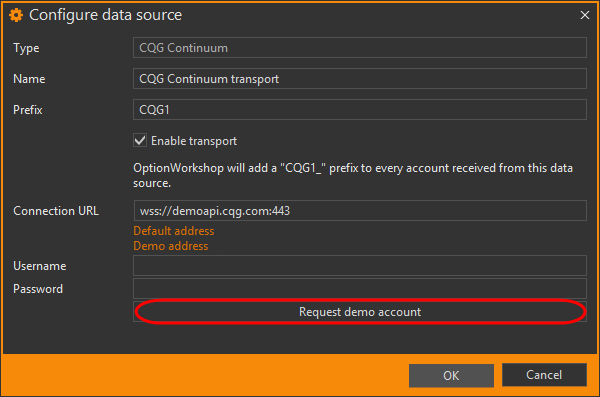
Fill out the fields [1] and click the OK button [2].
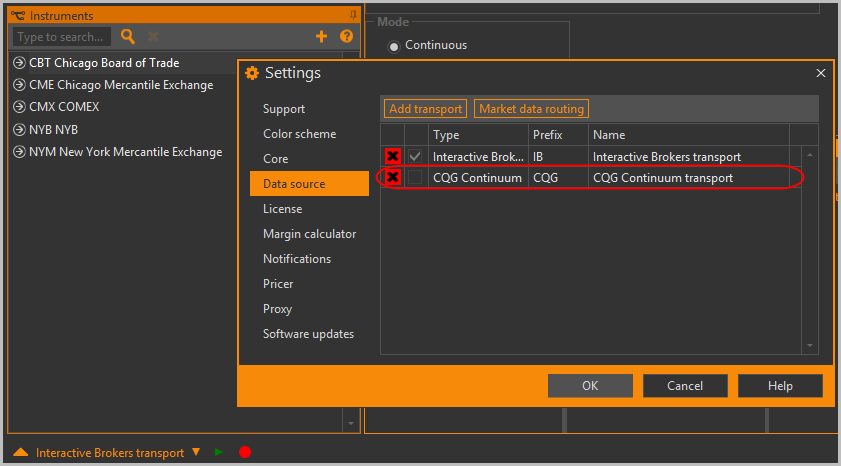
Click the OK button in the Data source tab.
CQG Continuum parameters
Type: The data source type name
Name: The data source name specified by user
Prefix: Prefix, which will be added to every account received from this data source
Enable transport: If you uncheck the checkbox, the transport will be added to the list of data sources but OW will not connect to this transport
Connection URL: Address of CQG server to connect. To add the default address click the Default address link. Additionally, you can add the demo address by clicking the Demo address link.
Information about how to get a demo access (login and password) for CQG Continuum is given here
Username: CQG username
Password: CQG password
Request demo account: A button to request demo access for CQG Continuum
In order to monitor the data source connection status, there are special indicators:
| Icon | Description |
|---|---|

|
Blinks when a transaction is sent to the data source |

|
Blinks when data is received from the data source |

|
Indicates there is no connection to the data source |

|
Indicates connection to data source is being established |

|
Indicates the data source is connected |

|
Indicates error state, unknown state |
To temporarily disable a source, use the quick start and stop buttons in the bottom of the OptionWorkshop window.
Click the  button to open the Transport control form.
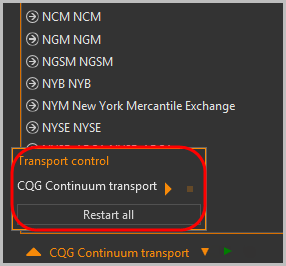
To stop the data source, click the  button.
To start the data source, click the
  button.
To restart all data sources, click the Restart all button.
See also:
CQG Continuum demo access
CQG Continuum demo access will expire after 5 days from the date of request. You can use the same email address to request only two demo accounts.
To get a demo access (login and password) for CQG Continuum:
click the Request demo account button
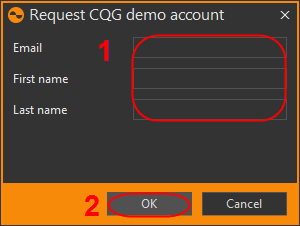
enter your email, first and last name, and click the OK button.
A form with credentials will appear on the screen
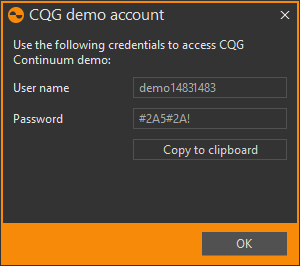
click the OK button. The Username text box and the Password text box will be filled automatically

Integration with Interactive Brokers
OptionWorkshop can be seamlessly integrated with Interactive Brokers (IB) products such as Trader Workstation (TWS) or IB Gateway. Regardless of the connection type, you can receive and place orders in the trading system.
Integration with Trader Workstation (TWS)
You can download TWS on the Interactive Brokers website
To connect OptionWorkshop to TWS:
Run TWS and sign in.

Select Edit → Global Configuration….
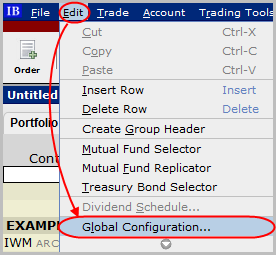
Select API → Settings in the Configuration tree on the left panel [1].
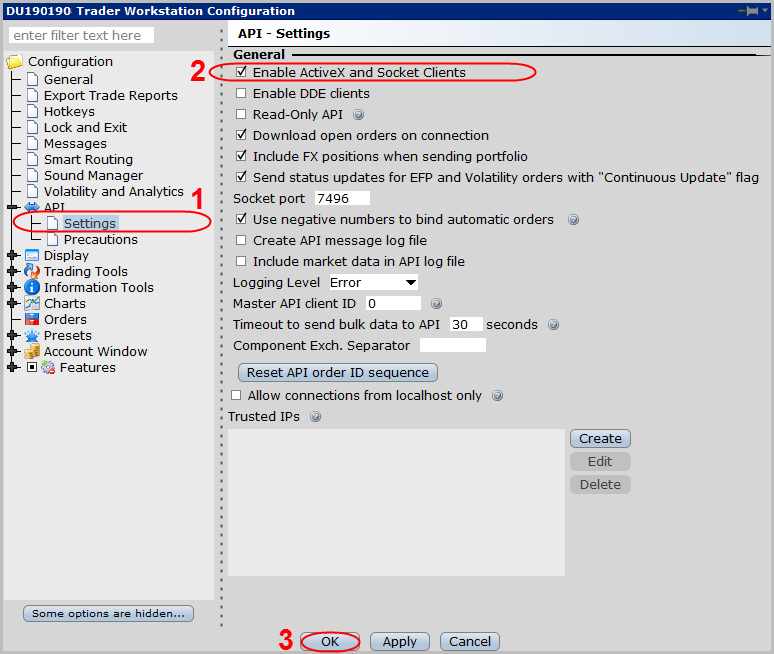
Check Enable ActiveX and Socket Clients[2].
Also pay attention to the Socket port textbox (it is
7496by default) and Master API client ID textbox (it is0by default). If you specify other values, you will need to specify these parameters in the Data sources form.Click the OK button [3].
In OptionWorkshop open the Settings window by clicking the
 button on the toolbar.
Open the Data source tab [1].
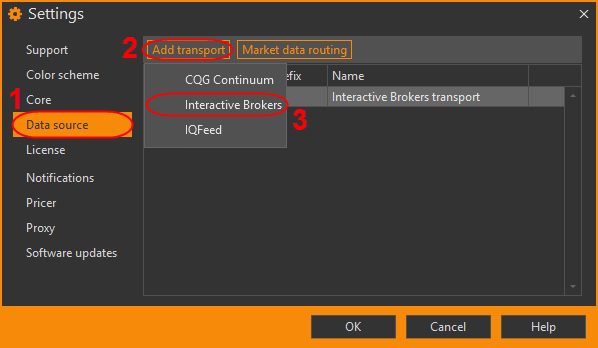
Click the Add transport button [2].
Select the Interactive Brokers transport in the drop-down list [3].
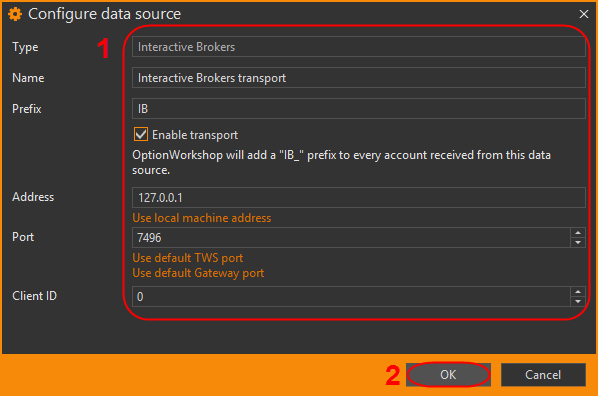
Fill out the fields [1] and click the OK[2].
- Click the OK button in the Data source tab.
In order to monitor the data source connection status, there are special indicators:
| Icon | Description |
|---|---|

|
Blinks when a transaction is sent to the data source |

|
Blinks when data is received from the data source |

|
Indicates there is no connection to the data source |

|
Indicates connection to data source is being established |

|
Indicates the data source is connected |

|
Indicates error state, unknown state |
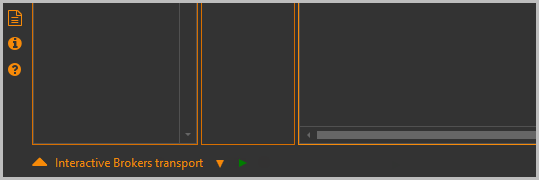
To temporarily disable a source, use the quick start and stop buttons in the bottom of the OptionWorkshop window.
Click the  button to open the Transport control form.
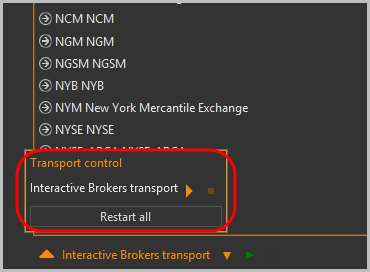
To stop the data source, click the  button.
To start the data source, click the
  button.
To restart all data sources, click the Restart all button.
TWS parameters
Type: The data source type name
Name: The data source name specified by user
Prefix: Prefix, which will be added to every account received from this data source
Enable transport: If you uncheck the checkbox, the transport will be added to the list of data sources but OW will not connect to this transport

Address: IP address of the computer. If IB and OW software are both installed on the same computer, specify
localhostor127.0.0.1by clicking the Use local machine address link.Port: TWS port. To use the default value click the Use default TWS port link. Its value must match the value of the Socket port textbox in the settings of the source.

Client ID: The client number of the application connected to IB. By default, its value is
0. If you have more than one program connected to IB, you need to specify the client number for the appropriate program. Its value must match the value of the Master API client textbox in the settings of the source.
See also:
Integration with IB Gateway
You can download IB Gateway on the Interactive Brokers website
To connect OptionWorkshop to the IB Gateway:
Run IB Gateway and sign in.
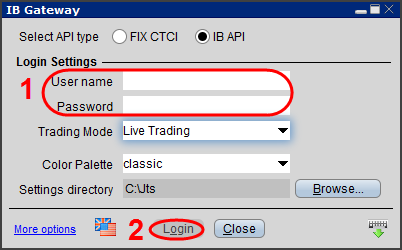
Select Configure → Settings[1].
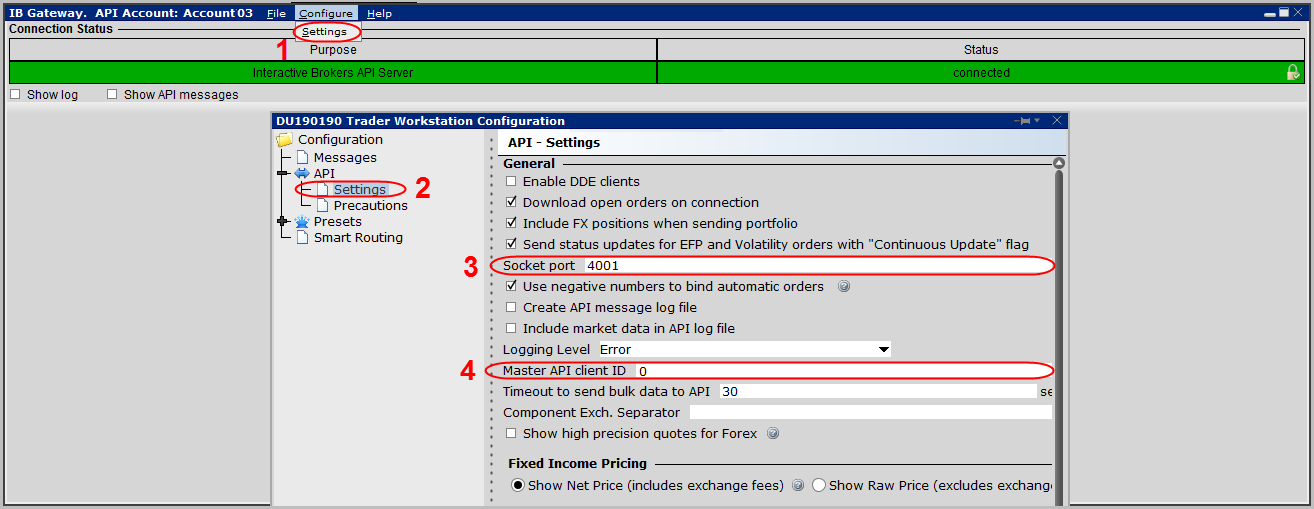
Select API → Settings in the Configuration tree on the left panel [2].
Pay attention to the Socket port textbox (it is 4001 by default) [3] and Master API client ID textbox (it is 0 by default) [4]. If you specify other values, you will need to specify these parameters in the Data sources form.
In OptionWorkshop open the Settings window by clicking the
 button on the toolbar.
Open the Data source tab [1].

Click the Add transport button [2].
Select the Interactive Brokers transport in the drop-down list [3].
Fill out the fields [1] and click the OK[2].
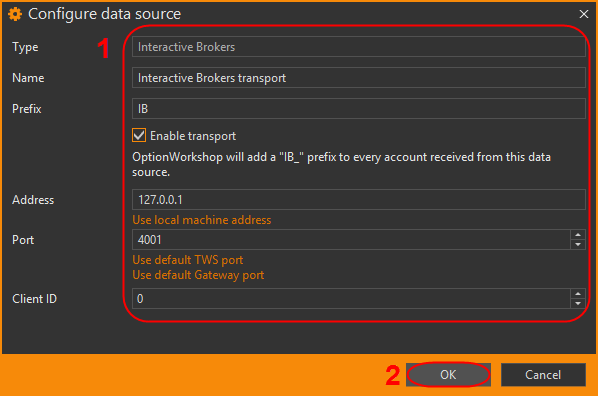
Click the OK button in the Data source tab.
In order to monitor the data source connection status, there are special indicators:

| Icon | Description |
|---|---|

|
Blinks when a transaction is sent to the data source |

|
Blinks when data is received from the data source |

|
Indicates there is no connection to the data source |

|
Indicates connection to data source is being established |

|
Indicates the data source is connected |

|
Indicates error state, unknown state |
To temporarily disable a source, use the quick start and stop
buttons in the bottom of the OptionWorkshop window.
Click the  button to open the Transport control form.

To stop the data source, click the  button.
To start the data source, click the
  button.
To restart all data sources, click the Restart all button.
IB Gateway parameters
Type: The data source name
Name: The data source name specified by user
Prefix: Prefix, which will be added to every account received from this data source
Enable transport: If you uncheck the checkbox, the transport will be added to the list of data sources but OW will not connect to this transport.

Address: IP address of the computer. If IB and OW software are both installed on the same computer, specify
localhostor127.0.0.1by clicking the Use local machine address link.Port: IB Gateway port. To use the default value click the Use default Gateway port link. Its value must match the value of the Socket port textbox in the IB Gateway settings.
Client ID: The client number of the application connected to IB. By default, its value is
0. If you have more than one program connected to IB, you need to specify the client number for the appropriate program. Its value must match the value of the Master API clienttextbox in the IB Gateway settings.
See also:
Integration with IQFeed
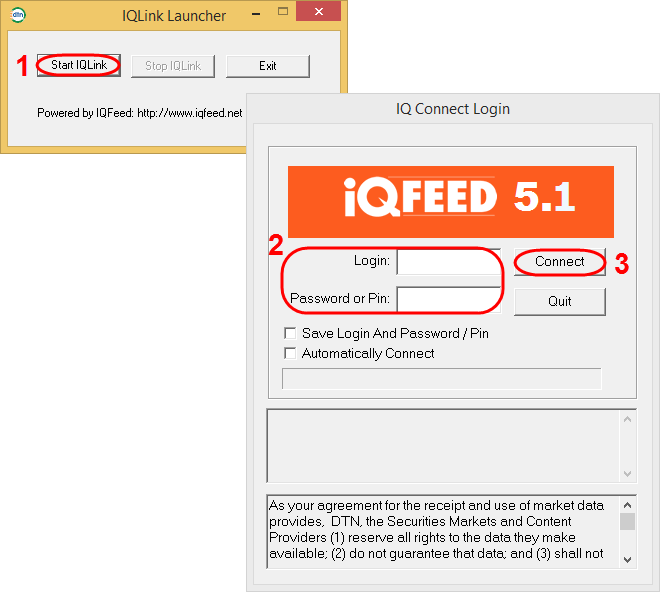
You can download IQFeed on the IQFeed website
To connect OptionWorkshop to the IQFeed data source:
Run IQFeed and login.
In OptionWorkshop open the Settings window by clicking the
 button on the toolbar.
Open the Data source tab [1].
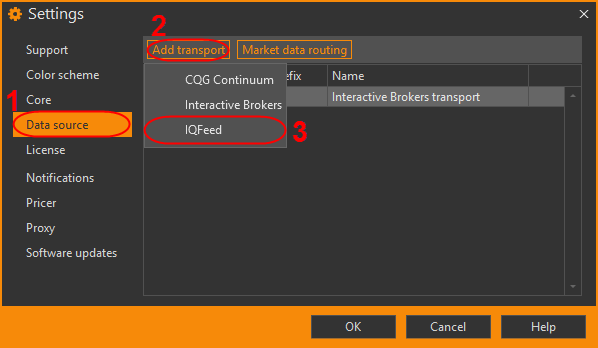
Click the Add transport button [2].
Select the IQFeed transport in the drop-down list [3].
Fill out the fields [1] and click the OK[2].
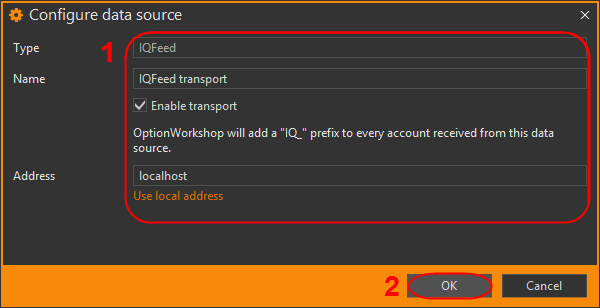
Click the OK button in the Data source tab.
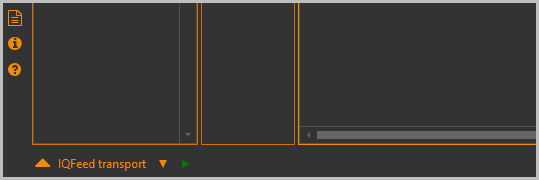
In order to monitor the data source connection status, there are special indicators:
| Icon | Description |
|---|---|

|
Blinks when a transaction is sent to the data source |

|
Blinks when data is received from the data source |

|
Indicates there is no connection to the data source |

|
Indicates connection to data source is being established |

|
Indicates the data source is connected |

|
Indicates error state, unknown state |
To temporarily disable a source, use the quick start and stop buttons in the bottom of the OptionWorkshop window.
Click the  button to open the Transport control form.

To stop the data source, click the  button.
To start the data source, click the
  button.
To restart all data sources, click the Restart all button.
IQFeed parameters
Type: The data source type name.
Name: he data source name specified by user.
Enable transport: If you uncheck the checkbox, the transport will be added to the list of data sources but OW will not connect to this transport.
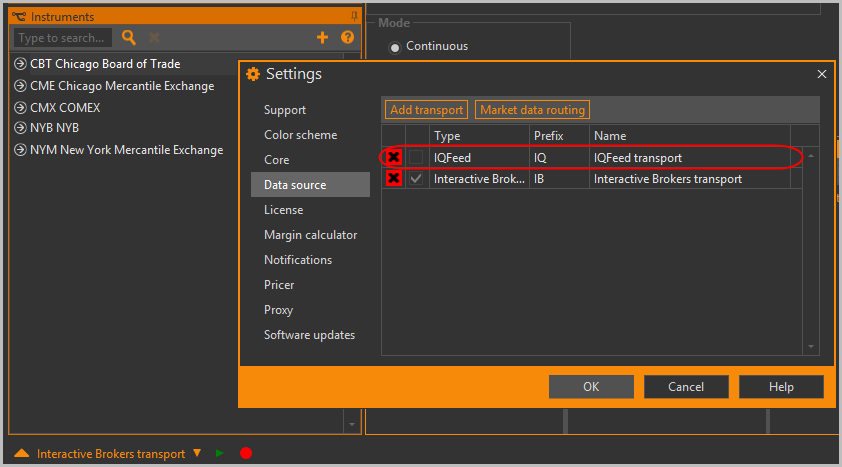
Address: IP address of the computer. If the gateway and OW are both installed on the same computer, specify
localhostor127.0.0.1by clicking the Use local address link
See also:
Integration with dxFeed
To connect OptionWorkshop to the dxFeed data source, do the following:
Open the Settings window by clicking the
 Settings button on the toolbar.
Open the Data source tab.
Click the Add connector button.
Select the dxFeed in the drop-down list.
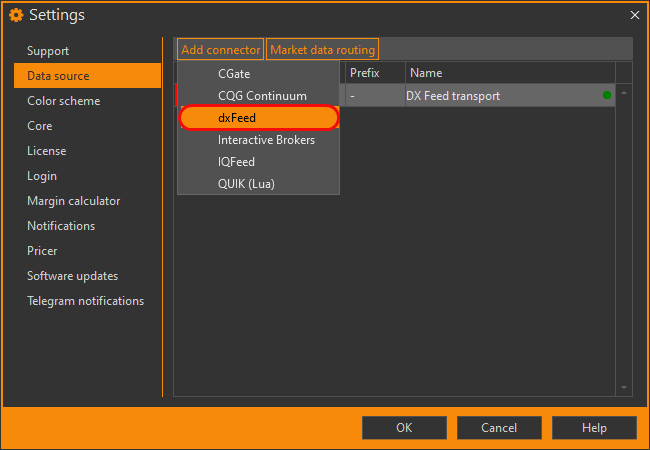
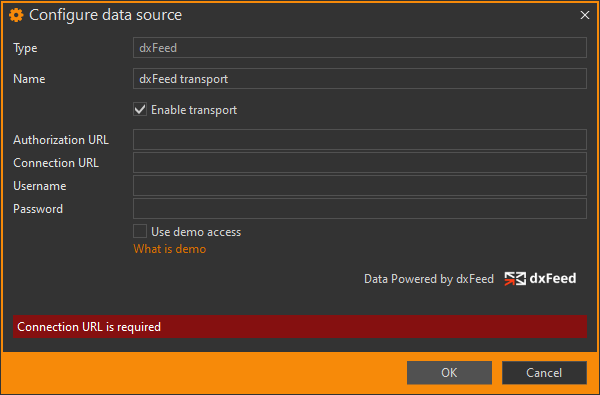
Fill out the requested parameters and click the OK button.
Click the OK button in the Data Source tab.
In order to monitor the data source connection status, there are special indicators:
| Icon | Description |
|---|---|

|
Blinks when a transaction is sent to the data source |

|
Blinks when data is received from the data source |

|
Indicates there is no connection to the data source |

|
Indicates connection to data source is being established |

|
Indicates the data source is connected |

|
Indicates error state, unknown state |
To temporarily disable a source, use the quick start and stop buttons in the bottom of the OptionWorkshop window.
Click the  button to open the Transport control form.
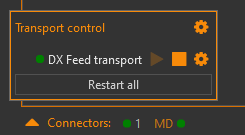
To stop the data source, click the  button.
To start the data source, click the
  button.
To restart all data sources, click the Restart all button.
dxFeed parameters
- Type: The data source type name
- Name: The data source name specified by the user
- Enable transport: If you uncheck this checkbox, the transport will be added, but OW will not launch it
- Authorization URL: A URL of dxFeed authorization service
- Connection URL: A URL of dxFeed market-data server
- Username: dxFeed username
- Password: dxFeed password
- Use demo access: The checkbox to access the dxFeed without an account

