Option desk
The Option desk contains detailed information on option contracts within a selected series. The Option desk allows users to:
- View and analyze the current position on options in the series; and
- Place orders on an option or an underlying asset.

When you hover the cursor over the tab name, a tooltip with the expiration date of the options series will be shown.
Opening Option desk
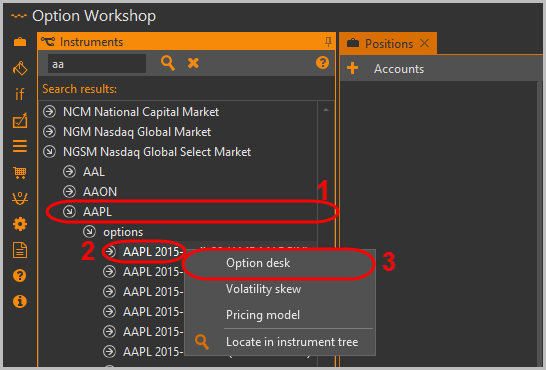
To open the Option desk:
Select the underlying asset (for example, an equity or a future contract)in the Instruments window [1].

Select the series under the selected asset [2].
Right-click the series to open the context menu.
Click the Option desk command [3].
You can have multiple option desks for different option series open at the same time.
Option desk description
The Option desk is a table with the following columns:
Strike – option strike
Option series – select an option series from the list

Position – the current position (to display the values you need to select a strategy in the Show position from field)
Last price – price of the last trade
Vola – market volatility
Theo – theoretical price
Ask – best ask prices
Bid – best bid prices
The best bid and ask prices are now highlighted, depending on the theoretical price. Cells are highlighted if:
- the best bid price is higher than the theoretical price, or
- the best ask price is lower than the theoretical price.

Ask IV – implied volatility of the best ask prices
Bid IV – implied volatility of the best bid prices
Theta, Vega, Gamma, Delta – option greeks
Intrinsic value – the difference between the underlying's price and the strike price
Time value – the difference between the option’s theoretical price and its intrinsic value
Open interest – it’s not yet available for all data sources, but will be developed in updates soon
All columns (with the sole exception of the Strike price column) are present in two copies – one is
for call options and the other is for put options.
The CALL  and PUT
  options
are combined into rows by their strikes.
The strike closest to the current price of the underlying asset is highlighted.
Above the table there are:

The current price indicator of the underlying asset.
Buttons for selecting the number of strikes.By default 10 strikes are displayed.
The strike selection button. This setting allows you to display strikes regardless of the current price of the underlying asset. To do this:
- Click Show all.
- Select the strikes by clicking on the check box.
- Uncheck Show all.
The dropdown list of the strategy selection. The button opens a list where you need to choose a strategy.If the strategy contains a position on an option that is displayed in the option desk, its quantity will appear in the corresponding Position column.
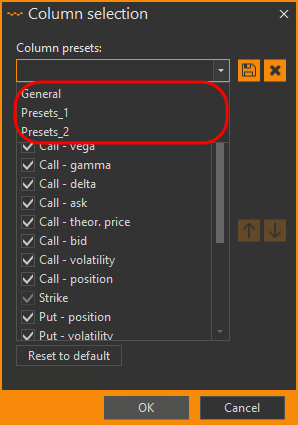
The dropdown list of the column presets. Information about how to create preset is given here.

Available actions
The Option desk enables the user to:
Call/Put:
Order Book– work with Order Book (see Order book);
Buy/Sell – place orders (see Orders manager);
Historical chart – view the historical chart (see Historical charts);
Add to instrument board – add financial instruments to the Instruments Board (see Instruments Board); and
Locate in instrument tree – search for instruments in the General instruments list (see Instruments tree).
an Option Series submenu with the following commands:
- Option desk – open an Option Desk;
- Volatility skew – open a Volatility Skew chart;
- Pricing model – configure a Pricing model;
- Spread desk – open a Spread desk.
Spread templates – create positions from the template (see Creating positions from the template in the Option desk);
To perform an operation:
- Right-click on the option to open the context menu.
- Click the type of option (Call or Put) [1].
- Click the desired command from the menu [2].

Column display settings
You may configure which columns will be visible by clicking
the  button.
Use the checkboxes to specify which columns you wish to see on the option desk,
then click the OK button to apply changes.

To save the preset of selected columns:
- Enter the group name in the Column presets field [1].
- Click the Save button [2].
- Click the OK button [3].
The presets will be displayed in the drop-down list.

To reorder columns:
Click-and-hold the left mouse button on the column to be moved.
Drag the column to the desired location.
Release the mouse button to drop the column in its new place.
You can also use the
 and
and  buttons in the Column selection window.
To return to the default column order, click the Reset to default button.
You can automatically adjust the columns' width to fit the window size by clicking the  button.
Column settings will be saved and apply automatically in upcoming OptionWorkshop launches.
If you want to return to default settings, click
the  button.

